Hello Everyone!
I apologize that I have not posted
sooner. Since my last blog post, all of the windows have been installed in my
house. My door was not installed, because the casing needed some repairs. Since
the seal between the two window panes in the door appears to have broken (there
is condensation between the panes), I will not be able to use it, so I bought a
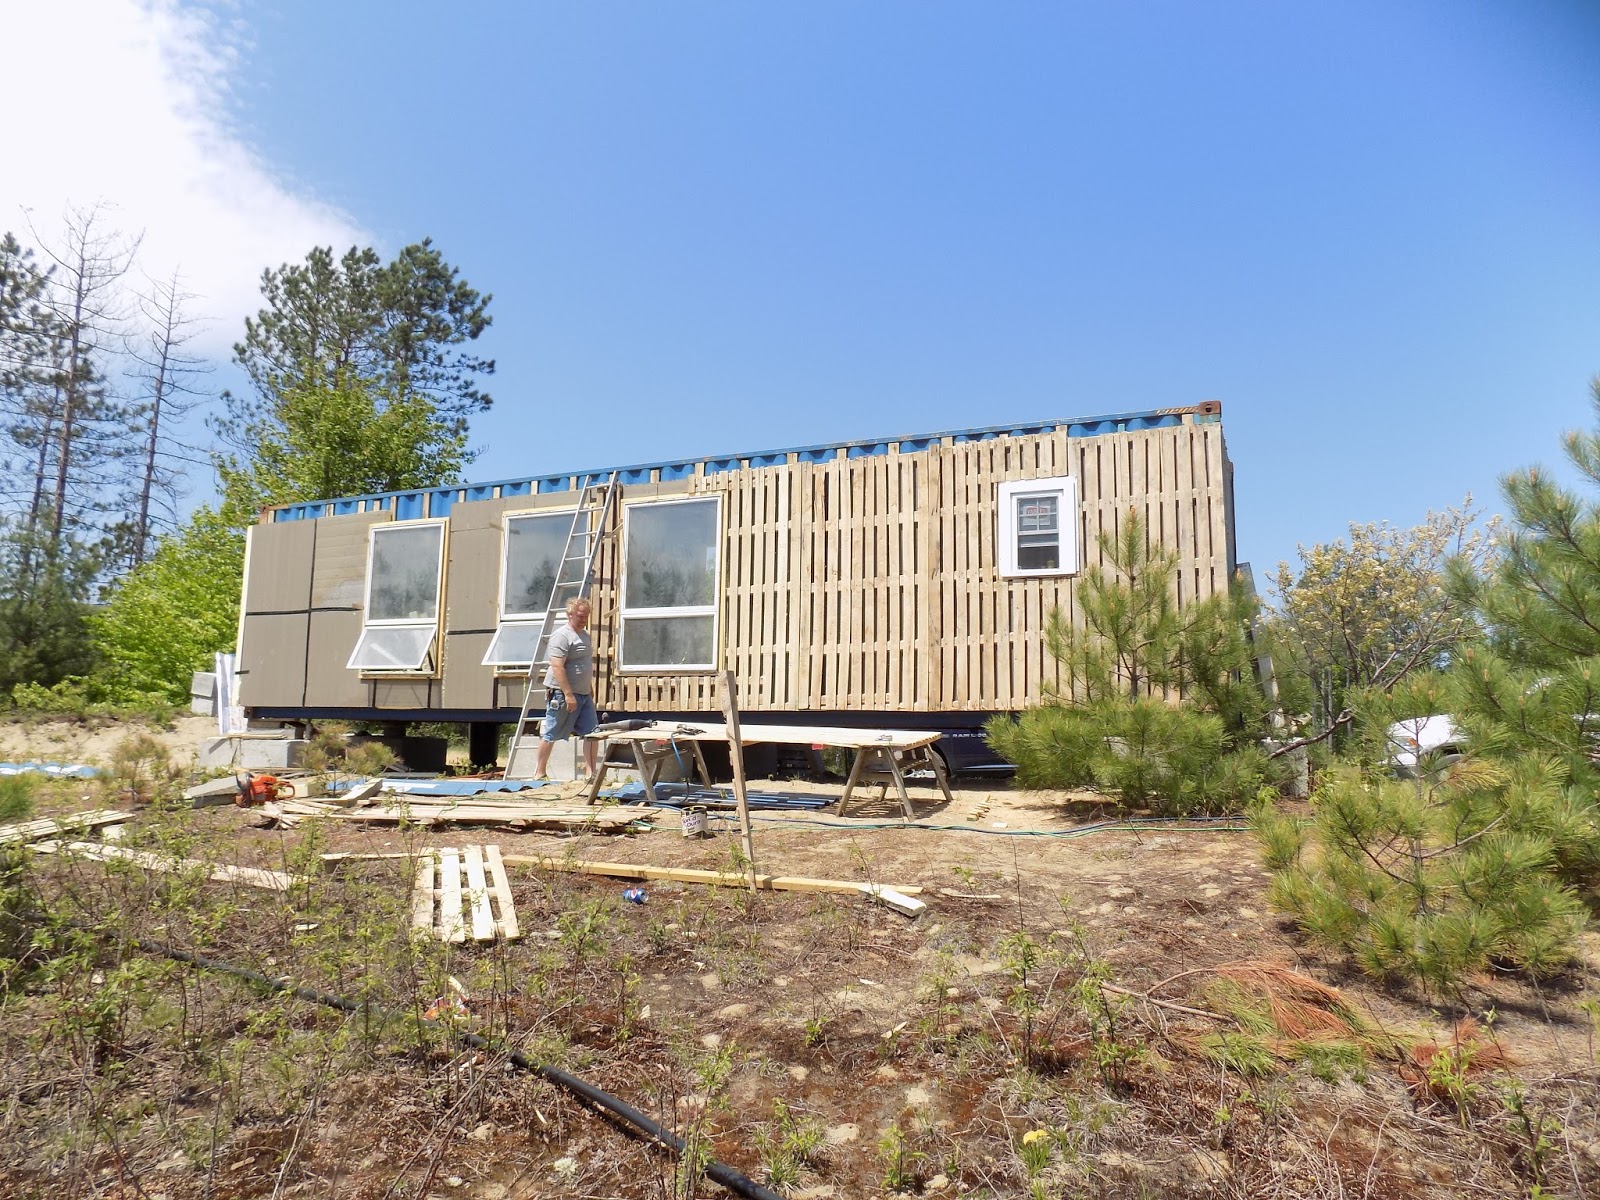
new one. I also finished attaching
strapping to my house, with the help of my father. It is a two-person job, as
one person must hold the strapping in place from the outside, while another
pre-drills holes in it from the inside and fastens it to the container with
screws.

 |
| This is the strapping. There are two 2x4s, each measuring 4 feet in length, spaced every other recessed corrugation in the container wall. On the end of the container that has the doors (the end visible in this picture, though the doors themselves are not visible), there are only 2x4s on the sides and in the middle. |

Insulation


 |
| Here I am cutting a piece of insulation to fit around a window. Though not necessarily challenging, it took a lot more time to install the insulation and siding on the south side of the house (which has the picture windows) than the north side, because we had to cut them to fit around the windows. |

As you may remember from the post
where I provided a background on my project, I am using extruded foam board insulation
that has an R-value of 30. Last Saturday (May 23), I began installing my
insulation, with the help of my father and another person. To hold the
insulation in place, we placed two or three screws in each 4-foot by 4-foot
sheet. Except for the side of the container that has the original doors on it,
all of the insulation has been attached.
In addition to the main insulation,
I have been using caulking and cans of spray-foam insulation to seal around the
windows.
Siding
 |
| Here, I am placing a screw into the siding to secure it to the strapping attached to the house. |
 |
| The crate covers that I am using for siding are slightly larger than what is needed, so they needed to be trimmed slightly. |
 |
| The exposed metal wall that you see at the top will be covered by a cap, which Arthur Stone will build. Essentially, it will be a piece of flashing that is connected both to the roof and the wall, covering the top of the wall and keeping water out. |

As we were installing the insulation,
we also began installing the siding. For siding, I am using crate covers from a
company called Columbia Forest Products, which operates a manufacturing plant
in the city of Newport, which is approximately 20 miles from me. They look
somewhat similar to shipping pallets, though they are longer and shallower. I
acquired twice as many as would be needed to cover my walls. Half of them serve
as the base layer, which are attached to the walls of my container via 6-inch
screws that go through the insulation and attach to the strapping on my walls.
I was unable to find screws of sufficient length that were not extremely expensive,
so the screws needed to be countersunk by approximately an inch. The second half of the crate covers I
acquired were dismantled. Their slats are being stapled to the base layer to cover the gaps,
and the 2x4s which hold the covers together were used as my strapping.
The process of installing the
siding has been somewhat difficult, especially on the south side, as portions
of the covers had to be cut out for the 3 large picture windows. We first began
using my father’s circular saw. After cutting part of one crate cover, the
motor burned up, and the saw was no longer functional. For many of the other
crate covers on the south side, we used a reciprocating saw for some parts and
a chainsaw for others. For the west and north ends of the container, we have
only used the reciprocating saw.
For shortening the siding, we would
remove the 2x4 on the end of the siding, move it back to the desired length,
re-staple the slats onto the 2x4 with a pneumatic stapler, and cut off the
portion extending past the 2x4.
Ceiling
 |
| They may be a bit difficult to see, but on every blue spot, there is a metal hook welded to the ceiling. Hanging from the hooks are pieces of wire, which the grid will attach to. To install the insulation on the ceiling, a small hole is cut for the wire to go through so that the grid can attach to it. The metal near the top of the wall also supports the grid and is secured by screws. |
 |
| Here is a better picture of the wires. |
 |
| The insulation was glued to the ceiling. The yellow machine is holding the insulation in place while the glue dries. |

 |
| I do not currently have any pictures, but there are now cross-members on the other side of the ceiling as well. Additionally, there are three layers of 1-inch foam insulation to add R-Value to the ceiling. The entire R-Value is 51. |
My Uncle
Steve, who has installed drywall in buildings ranging from office buildings, to
condominiums, to ski resorts for 30 years, has installed much of my ceiling.
For insulation, I am using the same R-30 insulation as I am using on the walls.
Since this is considerably less than the amount recommended by EnergyStar for my climate, I also asked that three
sheets of R-7 foam insulation be added.
As you may remember, I am not
adding a pitched roof to my house, so I cannot make any type of hole in my
ceiling, or it will leak. Therefore, I
am using a 650 grid system. Essentially, it is a suspended ceiling system that
uses thin pieces of metal that hang from the structural ceiling via metal
wires. Since ceiling finishes can be fastened to it, Uncle Steve says it is
commonly used in parking garages where there are no surfaces to use screws,
nails, or staples as fasteners.
To attach this system to the
ceiling of the container, hooks were welded to the ceiling’s center every three
feet down the entire length of the container. The wire for the grid system
attaches to the hook, which is then clamped closed with pliers. The pieces of
wire extend approximately 6 inches from the hooks. The thin metal rails hang
from these wires. Along with glue, the 650 grid system secures my insulation to
the ceiling. It will also secure my wiring (which will run between the insulation and the grid system), and the sheetrock on the ceiling
will also attach the 650 grid.
What’s Next?
In
order to install the insulation on the doors of the container (which will
eventually be sealed off and serve as one of the walls for my bathroom), I need
to remove the handles and latches that keep the doors closed. Since one of the
pieces of strapping extends below the bottom of the door, I will screw this
portion of the strapping to the container, below the floor. At the top, there
is a small metal plate attached to one of the doors that overlaps the other
door. Where the doors meet, there are two layers of metal. I plan to use a self-tapping metal screw to fasten the door
closed, as it will not penetrate the second layer of metal and therefore will
not be visible from the interior.
Thank you for reading!
Devin
Thanks for sharing information.
ReplyDeleteHome Window Installation
Windows And Doors Phoenix
Wood Window Replacement
Cheap Window Installation
Great post, you have pointed out some fantastic points , I likewise think this s a very wonderful website. attic insulation removal and replacement
ReplyDeleteХай! Если еще не определились, то я ходила делать ламинирование волос в салон Даймонд Бьюти. Все хорошо сделали, всем довольна! Очень советую!
ReplyDeleteДобрый день! Информативный пост. Респект за то, что поделились. Самые последние истории об окнах и дверях из дубового бруса http://sv-okna-vdnh.promportal.su/. Также можешь посмотреть тут: домостроительные информации., Окна эконом из сосны в дом серии, Арочное евроокно из дуба, окна rehau geneo, Деревянные евроокна из сосны в дом серии
ReplyDeleteСделали недорогое деревянное окно со стеклопакетом в Марфино с глухой и поворотной створками и форточкой, и такой же балконный блок, состоящий из двухстворчатого окна с поворотной створкой, форточкой и глухой створкой и балконной двери с зашитым низом. Также выполнили монтаж по ГОСТ, с лентами, в блочном девятиэтажном доме серии II-18-01 в Москве. Окно имеет размеры 1550 х 1260 мм и две створки. Слева глухая створка, справа открывающаяся створка и форточка сверху. Такую же конструкцию имеет окно размером 1550 х 1320 мм в балконном блоке, только глухая створка справа. Балконная дверь имеет размер 2240 мм и поворотную створку с зашитым сендвичем из фанеры и утеплителя низом.
ReplyDeleteВо всех оконных конструкциях установлены двухкамерные энергосберегающие стеклопакеты толщиной 28 мм и формулой 4-8-4-8-4И с низкоэмиссионными И-стеклами.
Выполнен монтаж окон по ГОСТ, с установкой снаружи паропроницаемой саморасширяюшейся ленты (ПСУЛ), изнутри - пароизоляционной ленты. Монтажный шов был заполнен пенным полиуретановым герметиком. Читать еще
This is my first time i visit here. I found so many entertaining stuff in your blog, especially its discussion. From the tons of comments on your articles, I guess I am not the only one having all the leisure here! Keep up the good work. I have been meaning to write something like this on my website and you have given me an idea. how to install vinyl siding
ReplyDeleteIf the curing time takes more than this or if the foam is not the correct color, check the valves on the tanks to make sure that they are turned fully on. Should no change occur, it would be good to contact your supplier. spray foam insulation kits for existing walls
ReplyDeleteLeather jackets for men have taken the world by storm, men's leather jackets
ReplyDeletewith its reformed silhouettes and style that enjoys a universal fan following.