Sunday, July 26, 2015

Lots of Progress: Roof, Wiring, and Subfloor Finished and More!

Hello Everyone,
I want to apologize for how long it has been since I last updated my blog. A large amount of progress has been made since my last post. Aside from covering the open corners, my siding and insulation are complete. Additionally, my Uncle Steve finished installing the suspended ceiling. My front door has been installed and painted and now only needs a doorknob. Arthur Stone installed the roof cap for my house. My father and I installed the wiring, and my grandmother Becky and I painted the interior of my house. In addition, my father and I have begun installing my subfloor.


The Roof

Building a pitched roof was both cost-prohibitive and, due to the container’s strength, unnecessary. I may eventually put a pitched roof on it. However, what is currently being used is a roof cap made of flashing. It slopes down from the container roof to cover the top of the insulation and siding and is screwed to the siding and the roof of the container. On the side touching the roof of the container, caulking was added under the flashing to create a water barrier. Before the caulking could be installed, I had to wash the edge of the roof (approximately a two-inch strip) to remove any dirt or other residue that would result in poor adhesion. I had a thick plank to kneel on, but the roof’s high temperature (which I could feel through my shoes) helped to make this a fairly unenjoyable task.

Wiring


My father did most of the wiring in my house, because I do not know how, though I was able to help with some aspects. Part of the wiring had to be redone after we were informed by my mother’s uncle (former electrical inspector for the State of Vermont, now serving a similar role at a large medical center) that it did not meet electrical code. He said that with the electrical wiring that was first run, there was the risk of electrocution, especially high since the metal walls have no covering other than a coat of paint.

Painting


As you may remember from the post I made giving a background on my project, I am using recovered Local Color paint from ReBuild, a store run by Vermont nonprofit ReSource. The Chittenden Solid Waste District accepts partial cans of paint and then combines and resells them. It cannot be guaranteed to be low-VOC (very important, as the house will be virtually airtight when the windows and doors are shut) because of the nature of its source. To mitigate these issues, I will be applying a coat of transparent Vermont Natural Coatings finish.
   
The Subfloor


The subfloor consists of 4-inch foam insulation boards (the same type used on the walls and ceiling) and tongue-in-groove OSB, which is a composite similar to, but less expensive than, plywood.  My father and I were able to install two sections of the floor on Saturday, July 25, and we finished the remainder of it the following day. This process has not been extremely difficult, but when I removed the tarp s from my insulation, a discovered that more than half of it was infested with carpenter ants. The other half seemed to be okay, but I sprayed a large amount of vinegar (which kills carpenter ants) on every usable sheet of insulation before it was brought inside, with special attention to any holes that the ants created. I also sprayed the container floor with vinegar before each sheet was placed.

What’s Next?
After installing the subfloor, the next step will be to install the ceiling. I had planned on using sheetrock, but have now decided to use paneling. After the electrical fixtures are installed, work on my ceiling will be complete. The partitions that will be used for my bedroom and bathroom walls also need to be cut and painted. 
After my ceiling and subfloor are installed, I expect construction to go much more quickly, so please check back. Thank you for reading!

Devin


Thursday, June 4, 2015

Strapping on, Windows in, Insulation, Siding Mostly on

Hello Everyone!
I apologize that I have not posted sooner. Since my last blog post, all of the windows have been installed in my house. My door was not installed, because the casing needed some repairs. Since the seal between the two window panes in the door appears to have broken (there is condensation between the panes), I will not be able to use it, so I bought a new one.  I also finished attaching strapping to my house, with the help of my father. It is a two-person job, as one person must hold the strapping in place from the outside, while another pre-drills holes in it from the inside and fastens it to the container with screws.


This is the strapping. There are two 2x4s, each measuring 4 feet in length, spaced every other recessed corrugation in the container wall. On the end of the container that has the doors (the end visible in this picture, though the doors themselves are not visible), there are only 2x4s on the sides and in the middle.


Insulation


Here I am cutting a piece of insulation to fit around a window.  Though not necessarily challenging, it took a lot more time to install the insulation and siding on the south side of the house (which has the picture windows) than the north side, because we had to cut them to fit around the windows.


As you may remember from the post where I provided a background on my project, I am using extruded foam board insulation that has an R-value of 30. Last Saturday (May 23), I began installing my insulation, with the help of my father and another person. To hold the insulation in place, we placed two or three screws in each 4-foot by 4-foot sheet. Except for the side of the container that has the original doors on it, all of the insulation has been attached.
In addition to the main insulation, I have been using caulking and cans of spray-foam insulation to seal around the windows.


Siding

Here, I am placing a screw into the siding to secure it to the strapping attached to the house.

The crate covers that I am using for siding are slightly larger than what is needed, so they needed to be trimmed slightly. 

The exposed metal wall that you see at the top will be covered by a cap, which Arthur Stone will build. Essentially, it will be a piece of flashing that is connected both to the roof and the wall, covering the top of the wall and keeping water out. 


As we were installing the insulation, we also began installing the siding. For siding, I am using crate covers from a company called Columbia Forest Products, which operates a manufacturing plant in the city of Newport, which is approximately 20 miles from me. They look somewhat similar to shipping pallets, though they are longer and shallower. I acquired twice as many as would be needed to cover my walls. Half of them serve as the base layer, which are attached to the walls of my container via 6-inch screws that go through the insulation and attach to the strapping on my walls. I was unable to find screws of sufficient length that were not extremely expensive, so the screws needed to be countersunk by approximately an inch.  The second half of the crate covers I acquired were dismantled. Their slats are being  stapled to the base layer to cover the gaps, and the 2x4s which hold the covers together were used as my strapping.
The process of installing the siding has been somewhat difficult, especially on the south side, as portions of the covers had to be cut out for the 3 large picture windows. We first began using my father’s circular saw. After cutting part of one crate cover, the motor burned up, and the saw was no longer functional. For many of the other crate covers on the south side, we used a reciprocating saw for some parts and a chainsaw for others. For the west and north ends of the container, we have only used the reciprocating saw.
For shortening the siding, we would remove the 2x4 on the end of the siding, move it back to the desired length, re-staple the slats onto the 2x4 with a pneumatic stapler, and cut off the portion extending past the 2x4.

Ceiling

They may be a bit difficult to see, but on every blue spot, there is a metal hook welded to the ceiling. Hanging from the hooks are pieces of wire, which the grid will attach to. To install the insulation on the ceiling, a small hole is cut for the wire to go through so that the grid can attach to it. The metal near the top of the wall also supports the grid and is secured by screws.

Here is a better picture of the wires.


The insulation was glued to the ceiling. The yellow machine is holding the insulation in place while the glue dries. 


I do not currently have any pictures, but there are now cross-members on the other side of the ceiling as well. Additionally, there are three layers of 1-inch foam insulation to add R-Value to the ceiling. The entire R-Value is 51.

                My Uncle Steve, who has installed drywall in buildings ranging from office buildings, to condominiums, to ski resorts for 30 years, has installed much of my ceiling. For insulation, I am using the same R-30 insulation as I am using on the walls. Since this is considerably less than the amount recommended by EnergyStar  for my climate, I also asked that three sheets of R-7 foam insulation be added.
As you may remember, I am not adding a pitched roof to my house, so I cannot make any type of hole in my ceiling, or it will leak.  Therefore, I am using a 650 grid system. Essentially, it is a suspended ceiling system that uses thin pieces of metal that hang from the structural ceiling via metal wires. Since ceiling finishes can be fastened to it, Uncle Steve says it is commonly used in parking garages where there are no surfaces to use screws, nails, or staples as fasteners.
To attach this system to the ceiling of the container, hooks were welded to the ceiling’s center every three feet down the entire length of the container. The wire for the grid system attaches to the hook, which is then clamped closed with pliers. The pieces of wire extend approximately 6 inches from the hooks. The thin metal rails hang from these wires. Along with glue, the 650 grid system secures my insulation to the ceiling. It will also secure my wiring (which will run between the insulation and the grid system), and the sheetrock on the ceiling will also attach the 650 grid.

What’s Next?
                In order to install the insulation on the doors of the container (which will eventually be sealed off and serve as one of the walls for my bathroom), I need to remove the handles and latches that keep the doors closed. Since one of the pieces of strapping extends below the bottom of the door, I will screw this portion of the strapping to the container, below the floor. At the top, there is a small metal plate attached to one of the doors that overlaps the other door. Where the doors meet, there are two layers of metal. I plan to use  a self-tapping metal screw to fasten the door closed, as it will not penetrate the second layer of metal and therefore will not be visible from the interior.


Thank you for reading!

Devin

Tuesday, May 12, 2015

Epoxy Applied to Floor, Window and Door Holes Cut, and More!

Hello Everyone!
I apologize that I have not posted in a while. Since my last post, I have purchased more of the materials I will need for my house, including handles for my cabinets, assorted lumber, screws, insulation, wiring, windows, interior paint, exterior stain, and a number of other items.
 On April 19, my father and I applied the zero-VOC epoxy to the floor of my container. You may remember that the purpose of this epoxy is to mitigate the pesticides contained in the floor, which prevent the container from carrying invasive species and protect its contents from pest infestations. The epoxy kit comes in 3 2-gallon jugs. Two of them contain what appears to be paint, labeled “Part A”. The third contains a liquid slightly lighter than olive oil, labeled “Part B”. Though it takes only 15 minutes after Parts A and B are mixed (in a 2:1 ratio) for its application to be difficult/impossible, it took approximately two days for it to dry completely. 
This picture was taken after my father and I pressure-washed the floor, walls, and ceiling of the container to remove any dirt. This did not mitigate the pesticides in the floor, however.

This picture was taken after the epoxy was applied to the floor. The purpose of the epoxy is to seal the floor to mitigate the pesticides in it. 

 Over the past week, I have disassembled all of the crate covers I will need in order to make the siding for my house. This was a very slow process, as quickly prying the boards away from the 2x4s (which I am using as the exterior strapping) that they were stapled or nailed to would result in the board being broken. However, I am saving the nails to potentially use later. Last week, I worked on pre-drilling holes in my container for the exterior strapping, which my insulation and siding will be fastened to. I had tried using a battery-powered drill. Drilling the holes is a fairly quick process, but it takes approximately two hours to fully charge the battery once it is too weak to drill more holes.  I have since begun using a plug-in power drill, so charging batteries is not an issue.
Window and Door Holes Cut Out


Here, I am building one of the frames for the opening, which are shown in the picture above this one.

This is what the inside of the container looked like after the holes were cut out. The openings on the left furthest from the camera are where my three picture windows will be. The area in the immediate foreground is where the bathroom will be, and it will extend just past the small window on the left. My kitchen sink will go under the opening on the right, closest to the camera. The far end of the container will be my bedroom and will extend toward the camera, just past the farthest picture window.

On Saturday, May 9, my Uncle Ken and my neighbor Jesse cut out the holes in my container for my windows and doors. Uncle Ken had originally planned on using a plasma torch, but instead used a metal-cutting saw. Contractor Arthur Stone (whom I consulted with on various aspects of my building plan) was also present to help build the frames for the windows and doors. Cutting the holes and building the window and door frames took approximately four hours.
                The pine trees to the west of my house provide shade in the late afternoon (from approximately 4:00 pm until sunset), but the container otherwise has has full sun exposure all day. Since this made for very hot working conditions (with temperatures outside of the container topping 80 almost every day last week and temperatures even higher inside the container), I was very excited to have the windows and door cut out. It made the container look much more like a house than simply a large blue box sitting in the field, and it also provided much-needed airflow, which has kept the inside of the container much cooler.
What’s Next?
Some of my next steps will be to continue attaching strapping to my house. I will also likely need to attach my insulation and siding before installing my windows. I am very much enjoying this project. I began this project with absolutely no building experience, so this is certainly a learning experience for me and is somewhat experimental. Please check back in the future for updates on my project, as I plan to post updates at least until my house is primarily finished!
Thanks for Reading!
Devin

Wednesday, April 8, 2015

Container On Blocks, Power Washed to Remove Dirt

Hello everyone!
I have been further preparing for construction of my house since March 28.

Moving the Container onto its Blocks

When I purchased my container from Moe's Equipment in October of 2014, it was delivered on a trailer with a winch. Moe's did not have a crane to lift it off of the trailer and place it onto its blocks. Instead, it was slid off of the trailer directly onto the ground near of the blocks, which is where it sat until March 28, which is the day that my Uncle Ken came with his tractor and, with the help of his son Laine and my father, towed the container onto its blocks.
                The first task was to remove the majority of the container’s contents, which my father, Kevin, helped with. I have been using the container to store many of my building materials, including my insulation, flooring, kitchen sink and cabinets, and kitchen stove. Everything except for the insulation was removed. My kitchen cabinets,  stove, and laminate flooring are currently being stored in my grandmother’s barn.
I was concerned that Uncle Ken’s tractor would not be able to move the container. He had come earlier that week to see if he would be able to move the container with his tractor. He said that since the container had been placed directly on the ground, he was concerned that it was frozen to the ground, in which case the container could not be moved until the ground thawed, which is generally mid to late April. Fortunately, the container had been placed over a slight dip in the ground, meaning that only a small portion of each end of the container had contact with the ground. To be safe and to make sure that the container was not frozen to the ground, a space heater was placed in the container with the doors cracked a few inches for airflow. It was operated for approximately an hour, and the container was not frozen to the ground.
 Uncle Ken’s tractor was not capable of lifting the container onto the blocks as a crane may, so it was instead towed across the blocks lengthwise. Uncle Ken attached two chains to the back of his tractor and then attached each chain to the two corners facing the blocks. It was then pulled onto the first row of blocks. When he drove onto the first set of blocks, he was at first unable to pull the container any further. My cousin Laine used my father’s tractor to push on the opposite end of the container, and they were able to push/pull the container onto the blocks.

Washing the Interior of My Container
 When the container was placed on its blocks, both Uncle Ken and my father suspected that the container was not level. On Friday, 4/3, my father and I pressure-washed the inside of the container to remove the dirt. This does not mitigate the issue of pesticides in the floors. To mitigate the issue of pesticides in the floor, I will be applying a no-voc epoxy to the floor. I have purchased this on eBay and am currently awaiting its arrival.  However, pressure-washing the inside of my container confirmed Uncle Ken and my father’s suspicion that my container was not level. It slopes to the southwest. This may be partially due to the ice buildup on top of the blocks, and it may also be partially due to the fact that the blocks were leveled only by sight when they were first placed. This issue will be addressed once the ground thaws and once the ice on the blocks melts. Pressure-washing the container was slightly difficult due to mechanical issues with the pressure-washer’s engine. Additionally, the fact that the container slopes away from the doors caused the water to pool in the southwest corner. I was able to remove much of the water with a push broom. Temperatures were in the 50s outside, with a warm breeze (a stark contrast to the blowing snow, temperatures in the mid/high 20s, and cold winds), and they were considerably warmer inside the container. The container became steamy just a couple of minutes after I began pressure-washing it, and the south wall was hot to the touch. This helped to evaporate any water that could not be swept out.
I have found this project to be very exciting thus far. I hope the weather will begin cooperating more so I can work more consistently on my house, instead of having only stray afternoons scattered throughout the month. Fortunately, there are warmer temperatures in the forecast. As I begin construction, I will be posting more updates, so please check back!


Devin


Friday, March 6, 2015

About the Author

Hello,
My name is Devin Mason. I live in the small town of Albany, located in Vermont's beautiful Northeast Kingdom, a Rhode Island-sized region in northeastern Vermont. Until the age of 14, my parents home-schooled me. At the age of 14, I enrolled at the Community College of Vermont. I graduated in 2013 at the age of 17 with an Associate's degree in Liberal Studies. In August of 2013, I enrolled at Goddard College, which is located approximately 10 miles northeast of Montpelier (Vermont's capital city). In August of 2015, I will graduate from Goddard with a Bachelor's degree in Sustainability.
      I have been fairly passionate about the environment since I was 13. My family has composted and recycled for as long as I can remember. However, it wasn't until after reading a book about our environment's poor condition that I became passionate about making an effort to help save it. It began with fairly small things such as replacing incandescent light bulbs with compact fluorescent ones. Then it grew to paying a bit more attention to the environmental impact.
      In 2010, I watched a documentary that highlighted some of the issues with industrial agriculture, such as its environmental impact, its social impacts, and the disregard for animal welfare. After showing the movie to my parents, I was able to persuade them to begin buying more organic food. Even before watching the documentary, we ate grass-fed beef raised by my uncle (we paid for the expenses associated with raising the cows, but since we did not have the land for cows, they were raised on my uncle's property). After watching the documentary, we began buying more organic meat instead of conventional meat.
      In 2012, my family moved off-grid and began growing a garden, and raising chickens and pigs, a decision my parents told my I also partially influenced. Since the soil around the house is very sandy, the garden is grown in raised beds which were filled with compost and manure. In 2014, the garden grew nearly 1,000 pounds of food.

Background on Project

For my senior project at Goddard College, I will be building a house using a used shipping container. My goal has been to build my house with primarily used or otherwise environmentally-friendly materials, and the house will also be off-grid. I will also incorporate other environmentally-friendly features such as rainwater collection, solar electricity, solar hot water, efficient use of space, passive solar heating, a greywater system for irrigation, and a composting toilet. 

Why I Am Able to Do This Project
My parents own 65 acres of land, most of which is lightly forested. Their house sits in a field atop a sand knoll. They are allowing me to build my house on their property too. Originally, I had chosen a site that was approximately 1,000 feet from my family’s house, in a clearing in a lightly wooded area at the edge of the hill, where it begins to slope downhill. However, I had chosen this spot when I had planned on building a timberframe house with different dimensions. Had I used this site for my container, I would have had to clear trees for it to be delivered. Additionally, I would have had to do some bulldozing on a path to make it passable for my car. It did not make environmental or economic sense, so I have chosen a spot in the same field as my parents’ house. A slight amount of leveling was required to create a level space to place the house. I will also likely need to lay some stone or gravel for my driveway, but I do not need to do any drastic modifications to make room for the house or driveway.
                Additionally, my Uncle Ken is a mechanic and has the tools necessary to cut holes for the windows and the door.
The Container
This is the container that I will use for my house. It measures 8 feet wide, 40 feet long, and 9 feet and 6 inches tall. I chose this container over the 8-foot-high container that was also available for two main reasons. The 8-foot-high container had a large dent in the ceiling that made it unsuitable. Additionally, the extra height allows me to build a loft for my bed. I will place my desk under my bed. The cost was approximately $300 greater than the 8-foot-high container.


      The container is located in Albany, which is located in northeastern Vermont, 40 miles north of Montpelier (Vermont's capital city). The container measures 40 feet in length, 8 feet in width, and 9 feet and 6 inches in height. I purchased it used in October of 2014 from a local company that purchases them used from the Port of Montreal in Montreal, Quebec, and then resells them. 

The Foundation
These are the blocks that my house will sit on. Just outside of this picture are two extra blocks that I thought I would need. I will use them if I decide to eventually expand my house.
For the foundation, I have purchased large cement blocks from a local cement and concrete company. The blocks are made from excess cement left in the trucks at the end of the day. Each of the blocks measures 6 feet in length, 3 feet in width, 18 inches in height, and weighs 4,000 pounds. My reason for this is because I am designing the entire house to be portable. The six blocks sit on top of the ground. If I choose to move somewhere else, I can take the house with me or sell it and move it off of the land. Selling it with the land is not an option, as it belongs to my parents. If the house is moved, the blocks too can be moved, and plants can grow on the plot once again. My Uncle Ken used his tractor to position the blocks. He has also offered his help on a number of other aspects of my house. Since he is a mechanic, he has the required tools to cut holes in the container for the windows and doors. 
          The company from which I purchased it did not have a crane to unload it off of the trailer it was delivered on and onto the blocks. They had a trailer with a winch, so the container was simply slid off onto the ground, where it still currently sits. My Uncle Ken thinks his tractor may be able to pick the container up if it is empty. Otherwise, my family's former neighbors own an excavation company and have equipment capable of placing the container on the blocks.
Electricity
My house is located slightly more than a half-mile from grid electricity. When my parents- whose house is closer to electricity than mine will be- requested an estimate from our local power company, they were given an estimate of $18,000 in 2012. My house will use a fairly small amount of electricity, less than 1000 watts of power, so I will install a small solar array and live off-grid.
Water Supply
                My parents have allowed me to connect to their spring. During warmer months, I will make use of the rainwater system I will install. My parents have allowed me to use their spring for water supply when precipitation does not fall as rain, and I will likely make use of the spring during dry periods. Another system I have considered is a system to melt snow. The pump located in the spring cannot be operated with the solar array, so a generator is required to operate it. As such, my parents’ water supply is stored in a barrel in a small building that is attached to their house (meaning that the generator is operated periodically to refill the barrel, rather than constantly to pump water directly from the spring to the house), which also contains the batteries for their solar array. My house will have a similar setup.
                Additionally, I will have baseboard radiators for heat, which will be provided by my parents’ outdoor wood furnace. I have considered placing a coil of water line inside my water barrel so that I could shovel snow into the barrel if needed and melt it with my heating system.
Wastewater
My house will generate greywater from my kitchen sink, my bathroom sink, and my shower. Since I will be using only biodegradable soaps and cleaners, I will use my greywater for irrigation. Since I will have a composting toilet, my house will generate no blackwater.
Heating and Insulation
This is the insulation I will be using on my house.
My house will be heated by my parents’ outdoor wood furnace. The furnace has a large amount of unused capacity, and from past experience, they have determined that connecting my house to their furnace will cause a negligible, if any, increase in the amount of wood the furnace burns. Therefore, I believe it will be greener than installing a new heating system, regardless of what fuel it uses. I will need to run approximately 400 feet of insulated PEX tubing, which will carry hot water in a closed loop between my the furnace and my baseboard radiators.
                For insulation, I am using 4-inch foam board insulation that I purchased from a person on Craigslist. Its R-value is 30, which is well above EnergyStar’s recommended minimum R-Value of 5 or 6 for . However, it is well below the minimum R-Value of 49 recommended for ceilings. However, I consulted with a local builder named Arthur Stone, a family friend, and he told me that airflow can change R-Value significantly. Since my container will be virtually airtight, he believes the insulation I have chosen to use should be sufficient. To prevent loss of space, I will attach my insulation to the outside of my house.
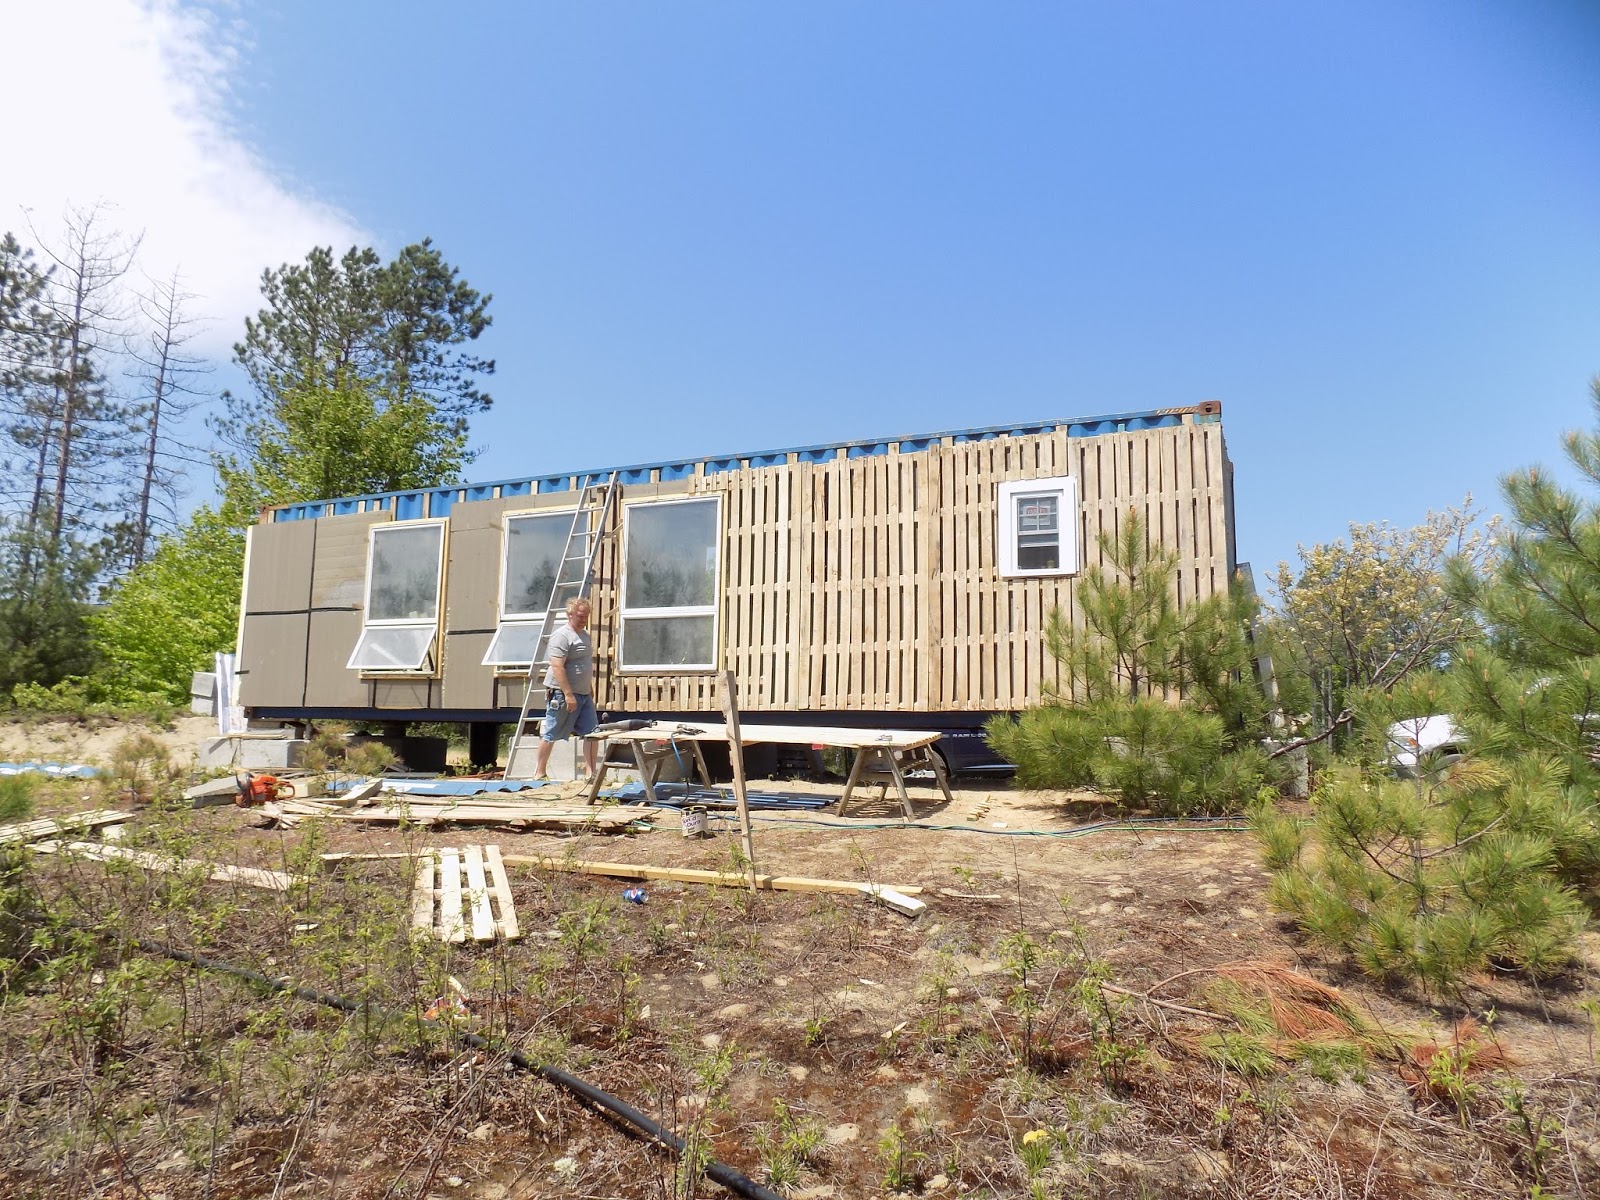
Siding and Finishes
For siding, I will be using wooden crate covers from a local factory that makes plywood and veneers. Some of their shipments arrive in wooden crates. The covers of these crates look similar to a thin, long shipping pallet. They give the crate covers away. To cover the gaps between the slats in the covers, I will disassemble some of the crate covers I take and use their slats to cover the gaps in the other crate covers.
                I will be using a whey-based stain on the outside of my house. For the inside of my house, I will be using used paint. There is a non-profit in northern Vermont that operates three used building supplies stores. They accept partial cans of paint and then combine and resell them, instead of the paint being sent to a landfill. A disadvantage of this paint is that due to the nature of its sourcing, it cannot be guaranteed low-VOC, and it most likely is not. However, the same company that makes the exterior stain I will use on my siding also makes a transparent coating that I plan to use to mitigate offgassing concerns.
Floor and Ceiling
The first thing I must do to my house before beginning construction is clean the floor in my container. Often, shipping containers’ floors are treated with pesticides to prevent them from carrying invasive species. I will be using a pressure washer and biodegradable soap to wash these pesticides out of the floor. I will be insulating the floor from the inside of the house . On top of the insulation , I will use plywood, which will act as a subfloor for the laminate wood flooring that I will use in my bedroom and in my living/dining room and the ceramic flooring that I will use in my kitchen and bathroom.
For this project, I will not be building a sloped roof on the house due to financial constraints. Arthur Stone says that the durability of a shipping container means that snow will not cause my roof to collapse. As such, I will be insulating my ceiling from the inside of my house. Since the insulation I will be using has a paper covering on one side, I had considered simply facing this side down toward the floor and then painting it. However, the Vermont Division of Fire Safety requires that there be a thermal barrier covering foam insulation.
Space Saving
The fact that I do not have a large number of possessions allows me to have a small house. I do not have a full furniture set or shelves full of items to make room for. Additionally, I will store infrequently-used items somewhere outside of my house.  Additionally, I will be building a loft in my bedroom. My desk will be located under my bed.
Conclusion
I cannot express how excited I am to work on this project. Due to the weather, I likely will not  begin construction until mid-April. I hope to have the house mostly finished by July. Once I begin construction, I will be posting updates, so please check back! Below is the plan I am using for my house, which I revised from a plan I found on Pinterest. Please feel free to leave your comments.